The Four Cs of Choosing a Diamond
At Sands Company Jewelers, we take pride in the fact that since 1988, we have always taken the time to help our customers make more educated decisions about their Diamond and Gemstone buying needs. We strive to answer each customer’s specific questions about how certain factors relate to pricing, and listen to what is important to them as a buyer.
There are many ways to “buy” or “select” a stone. Some customers want the biggest stone they can afford. Others want the “cleanest” stone they can afford. Still others want a good balance of size, brilliance, and brightness, – and they want to know they are getting a good deal.
The 4 C’s are a good way to begin to determine grading, and compare stones and prices on a global scale, in an “apples to apples” format.
We are going to speak of them here, in the order of importance at which we at Sands Company Jewelers use these same 4 C’s to make our own purchasing decisions. So let’s get started . . .
CARAT
Perhaps the most quoted factor, and a major price determining factor of a diamond is the Carat-weight, which is often thought of as the “size” of the diamond, and is many times the starting point for stone selection. But because most people think of Carat-weight and “size” interchangeably, there seems to be a bit of confusion surrounding the term Carat-weight.
Firstly, the term Carat is an actual unit for measuring weight, just like pounds, tons, grams, pennyweights, troy ounces, etc. Its origins date back to the ancient world, as traders in the Mediterranean and Middle East required a consistent balance to weigh goods against. For very small valuables, such as precious and rare gemstones, diamonds, and pearls, the carob seed became the standard unit of measure, because every carob seed always weighed identically to every other carob seed. Today, a Carat (ct) is a unit of mass equal to 200 milligrams.
Easy enough, – So why all the confusion? Well, because when someone asks, “How ‘big’ is it” in diamond-speak, what they are really asking is “what does it weigh?”, and yet somehow “visual size” is what comes to mind. People want to visually know how ‘big’ is a Carat, ~ which is the same as asking “how big is a pound?” “A pound of what?,” then becomes the next question.
Fortunately, because diamond is a mineral just like water is a mineral, its weight is fairly constant and measurable, just as most people can easily tell a half-gallon of water from a full gallon of water. But because diamonds are usually viewed from the top, only the length and width are mostly what is seen, and so the “depth” of a stone is not really considered by the viewer as important to is “visual size”.
So then, the “size” of a diamond is most accurately physically weighed on a scale.
So toward the purpose of gaining a general Visual understanding of Carats (cts), and keeping in mind that all stones are slightly unique in length, width, and depth, certain diameter sizes can generally give a pretty good clue to the Carat-weight of diamond, as follows:

As many diamonds are already physically set into a ring, pendant, or earring before a potential buyer gets to weigh them, this chart can be a helpful guide or “cheat”, when trying to determine exactly what “size” of diamond one is viewing, ~ but Please remember that the most accurate way to truly know how “big” a diamond is, is still to weigh it on a scale.
COLOR
At Sands Company Jewelers, we hold the Color of a diamond (or really any gemstone) in the second seat of importance, right behind Carat-weight. Certainly, there will be some retailers who disagree on this small issue of “order of importance”, but after all, we know that in the end we must look at ALL the 4 C’s if we are to effectively understand the grade and pricing of any given diamond, and so for the reasons I will state below, I am content to “agree to disagree” with those merchants.
Color, the second “C”, is a tricky little word, that does cause some confusion from time to time, until you get used to what it means.
Let’s start by saying the word I like to use in relation to “white” diamonds is NOT the word “Color”, – but the word “Colorlessness”.
You see, when we are speaking of a “white” diamond, we are really referring to a diamond that maintains some degree of transparency, – but we can’t say Clear! – because that would be Clarity, – right?! But it’s not really “white” either, because in reality, it’s transparent, or some varying degree of transparent, not opaque.

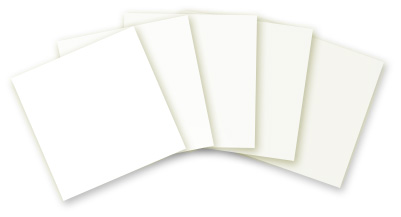
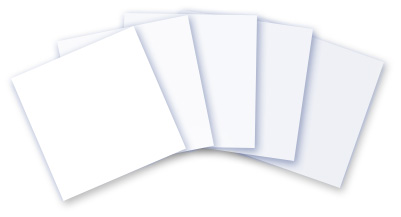
But to really get the gist, think of it for a moment as though it were actually “white”. In that case, what color is the left-most piece of paper in the stacks below? Most people’s honest answer would be “white”. Okay,- then what color is the right-most piece of paper? Again, most people would have to say some version of “white”. Is it Ivory? -is it Off-White?? – is it Cream? – China?
Get it? So in reality, when we are searching for a diamond with “Good Color” we are really looking for a Colorless diamond.
So then, when grading a diamond for Color, the lesser the tint or shade of any “off-whiteness” a diamond has, the more pure it is (the more free of trace elements it is), and thus the more valuable the stone is.
Diamond Color is rated on an alphabetical scale from D all the way to Z, with D being completely colorless to the point of being sometimes called “Flawless Color”. There is no A, B, or C on this scale.
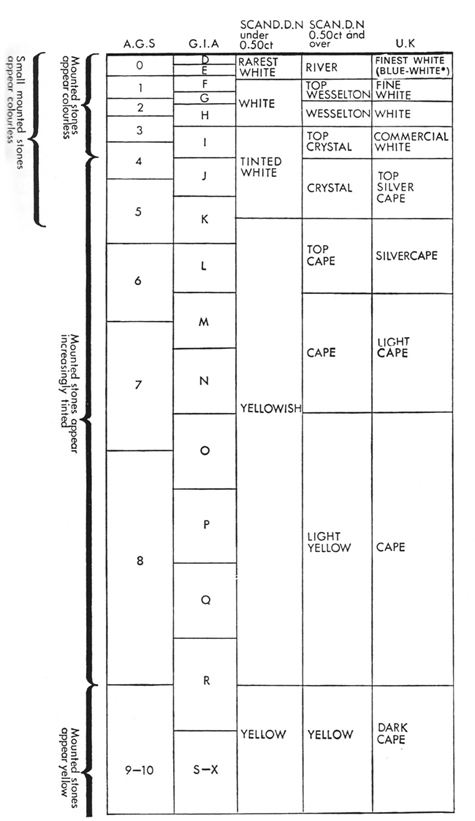
Diamonds grading D through F are considered colorless, while diamonds grading G through J are considered near-colorless. Diamonds rated below J are generally considered too tinted, and are rarely carried by jewelers, but can also be construed as “Fancy Diamond Colors”, such as Canary, Champagne, or Chocolate.
But I heard that diamonds come in EVERY color!?
True, – Diamonds can occur, and are found naturally in every color of the visible spectrum.
These are referred to as “fancy colors” like Yellow, Pink, Blue, and other varieties of more or less primary colors, along with mixed and more rich colors, and believe it or not, these Fancy Colored diamonds even have their own separate grading scale through the GIA.

Fancy colored diamonds have gained popularity in recent years, and are rated according to their hue, color saturation, and brightness.
CUT
The chosen shape of a diamond is one of its most visually identifying features, – but when a jeweler is speaking of the “Cut” of a stone, he or she is NOT referring to the shape of the stone, ie, round, pearshape, oval, marquise, baguette, etc; But rather they are specifically speaking about the “Make” of the stone, – in other words, that diamond’s specific proportions WITHIN its “shape”, and how they have been used by a professional diamond cutter, to create a high, medium, or low percentage of Brilliance.
Confused?!
It’s because ‘Cut’ in diamond-speak really refers to “what kind of Brilliance, Fire, or Life does this stone have” – but from a marketing standpoint, the words ‘Brilliance, Fire, Life, Proportions, Symmetry”, and other determining factors Do Not Begin with the letter “C” !
I know, – Right?! But I didn’t make the rules, I’m just trying to straighten them out for you.
The letter “C” in Cut, is the true balancing act of gathering and evaluating many mathematical principles used to explain and determine the liveliness, sparkle, fire, brilliance, and scintillation of a particular stone.
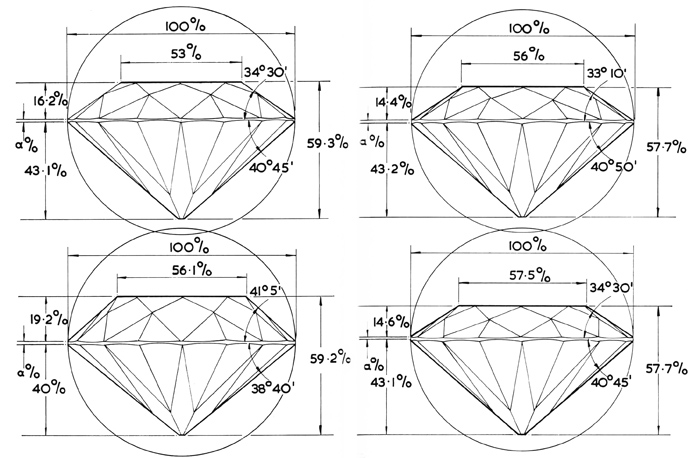
To see and understand these principles in action, it helps to know the main “parts” of a diamond as seen below:
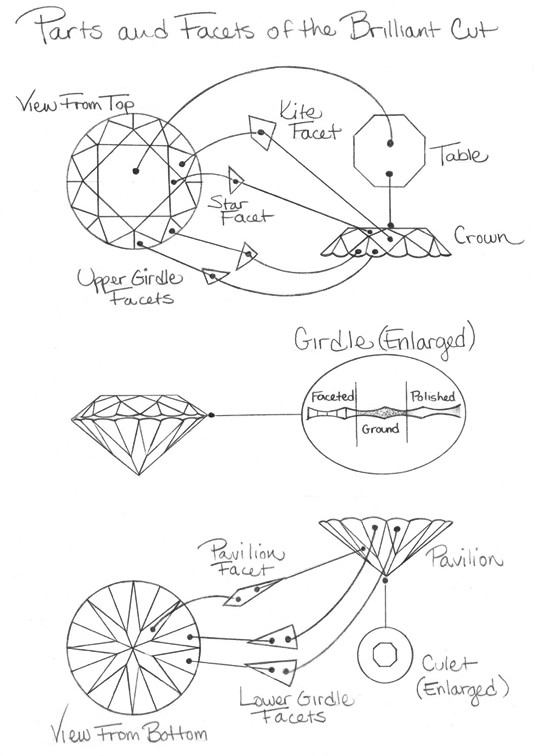
The main sections of a diamond for our intents and purposes, are:
The Crown, which is the upper portion of the stone, and the light-gathering (or lens) portion of the stone. This portion consists of the Table facet, a usually octagon shaped singular top facet; as well as the star, kite, and upper girdle facets.
The Girdle, which is generally considered as the area where the stone is “set”, held into place, or secured to a mounting. This section is typically either ground, polished or faceted, and is also where identifying features such as laser inscriptions may be found.
The Pavilion, which is the lower portion of the stone, and a portion we tend to think of as a reflector, such as we might find on the back of a headlamp or flashlight, to help keep reflected and refracted light moving back up and out of the stone. It is effectively a house of mirrors, – the real wheel-house of the brilliance
How does it work?
Light enters the diamond through the Crown (lens), passes through the internal body of the stone, which in its mineral density, actually bends (or refracts) the light into the colors of the rainbow, which then strikes the many pavilion facets of the belly of the stone. Then, the bent spectral light, as well as some white light (that may not have been at a sufficient angle for bending) is reflected back out through the many crown facets in a fiery display of brilliance.
However, if the stone is too wide, in relation to the depth, the stone will loose or absorb some of its light out of the sides. And if the stone is too deep, it will loose or absorb more light out of the bottom of the stone. In both cases, and in fact, in all mixture of cases in which the stone’s proportions aren’t “just right”, the angles of bounce pertaining to reflection and refraction will be distorted, diffused, or lost.

From left to right:
TOO SHALLOW: Light escapes from the sides, causing the diamond to lose brilliance – creates an opaque and glassy look.
TOO DEEP: Light escapes from the bottom, causing the diamond to appear dull and lifeless – creates a darkened center when viewed from above.
GIRDLE TOO THICK: Once again, light escapes from the bottom, but an overly thick girdle adds unwanted carat weight and price to the diamond.
IDEAL CUT: Perfectly proportioned, the maximum amount of light is refracted through the top of the diamond.
So what’s all the deep math about then?!
Well, each gemstone (diamonds, rubies, emeralds, garnets, etc) refracts light at a slightly different rate depending on its general density.
Therefore, stone-cutters throughout the centuries have determined that there are a specific “Ideal” set of Proportions, Percentages, Symmetries, and Parameters, that play well enough together to capture these perfect angles, yielding a high degree of Life, Scintillation, and Brilliance to a stone.
Actually, as technology advances, these “Ideals” have been historically nit-picked, argued over, changed, revised, and re-envisioned on a fairly continual basis, to varying small degrees, which is how we can have the Tolkowsky Ideal Cut, the Johnson and Rosch Ideal Cut, the Eppler Ideal Cut, the Hearts and Arrows Ideal Cut, and the Shalamar Ideal Cut, among so many other so-called “ideal cuts”.
The real idea, of course, is to start with the raw crystal material, and artfully and scientifically facet it in such a way as to enhance its natural beauty, taking in light, and giving back sparkle, radiance, and fire.
A well-cut diamond “fires” light out, as the stone is turned, creating the radiance that diamonds are known for.
Some helpful definitions from the jewelry industry:
Reflection: A “bouncing” of light
Refraction: A “bending” of light, many times into versions of a spectrum
Life: Reflected light. The quality of returning the maximum amount of light from within the stone, to the eye, – from the surface lustre and from internal reflection.
Fire: Refracted light. A breaking down of white light into a spectrum of colors, and returning it to the eye.
Scintillation: The quality of the dance, play, or spray of a sum of all reflected and refracted light created through the appearance and disappearance of light exiting through different facets. Motion.
Lustre: Lustre is gained not only from light reflecting back from the surface, but also on rays that have been partly absorbed, before reflecting back.
Brilliance: The total effect and evaluation of evenness of all of the above, – An even and symmetrical combination of Reflection, Refraction, Life, Fire, Scintillation, and Lustre.
Chapters, Books, and Volumes have been written on the elusive “C” in ‘Cut’, but you can simply stop into Sands Company Jewelers any time, and see it for yourself, through a personal hands-on presentation, with live goods!
CLARITY
The “C” in ‘Clarity’ is one of the best words in the trade. Many people think of it as a level or measure of Purity, but really, ‘Clarity’ is the right word. It means how much “stuff” is — or isn’t — in there! The carbon spots, the feathers, the rill inclusions, the “cracked ice” effect. The Clarity of a diamond is measured by the number of inclusions (or imperfections) in the stone. Or more specifically, – the lack of those inclusions.
The various grading scales, and we use the GIA Scale, all use a system of maximum allowable inclusions (or blemishes), in terms of overall mass, as viewed through a 10x (or 10 power) eyepiece, called a loupe.
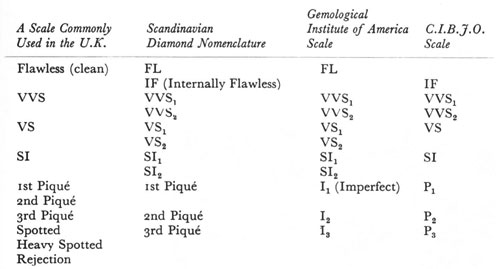
As you can see, from the top of the scale at Flawless (FL), to Internally Flawless (IF), the scale moves down through Very Very Slightly Imperfect (VVS1-2), to Very Slightly Imperfect (VS1 or 2), to Slightly Imperfect (SI1-2), to Imperfect (I1 through 3), and at the bottom of some scales is a grade called Reject (R).
Most inclusions are invisible to the naked eye. The highest-clarity diamonds have no inclusions, even at intense magnification.

One of the interesting things that we at Sands Company Jewelers have discovered, is that Clarity seems to be the first and strongest “push” grade, as well as seemingly the “most expensive” of the grading scales, as far as most retailers are concerned, as in “where is the customer’s money!”, – but believe it or not, it’s typically the very last thing you can see about your diamond. Personally, and conversely, we have always felt that more money should be spent on Color or Carat, which is something about your diamond that you will see every single time you look at it, – magnification or not!
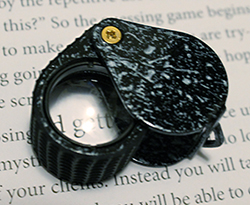
When grading for, or trying to determine the Clarity of a diamond you are interested in, ALWAYS ask to see a Loupe or a Microscope! If using a loupe, you’ll hold the loupe as close to your eye or your glasses as you can (I usually keep my glasses on), and then bring the stone in question ever-closer to the loupe, until the stone pops into focus. Of course everyone’s eyes are slightly different, but for most people, the focal length is between 5/8 of an inch and 1 1/2 inches. It helps to reach out with your fingers, and brace the loupe-holding hand against the diamond-holding hand, to steady the focal plane.
From this vantage point, if you slightly move the stone closer and farther, you will actually be able to focus “through” the stone, at various focal depths within the stone, and if you “rock” the stone from side to side, you might find that some of the smaller inclusions may “catch your eye” through their movement, that had otherwise gone un-noticed.
AND THE FIFTH C…
COST
Now for the 5th “C”
(…but wait, I thought you said there were only 4 C’s?!)
Most jewelers won’t talk about the 5th “C” of choosing a diamond, but it’s the one that many people have on their minds the most, – before they even set foot in a store — Cost!
Color, Clarity, Cut and Carat-weight all matter, but none of these match the importance of finding a diamond that not only suits you, and matches your Fiancé, but also suits your budget.
At Sands Company Jewelers, our goal is to match you with a ring that’s perfect on every level, – including the price tag. One thing I try to impart to my clients and friends, is that even if the stone is Flawless, even if the stone has D Color, even if the stone is 2 Carats, – there is still the next stone out there that is 3 Carats, or 4 Carats, or 6 Carats, etc. So the idea is that there is always something bigger, or better, or cleaner, – but what is really important is that this diamond, – YOUR diamond, – works and fits for YOU!